Sunday, March 13, 2016

Miso Glazed Salmon with Coconut Brown Rice and Braised Bok Choy

Hello Everyone! I am currently working on the 28 day cleanse meal plan and results to you. In the mean time, please check out my latest recipe!


Miso Glazed Salmon with Coconut Brown Rice and Braised Bok Choy


Recipe makes 2 serving per recipe

Prep Time: 24 Hours * Cook Time: 1 hour

Ingredients for the Salmon

  • 3 tablespoons of soy sauce
  • 1 tablespoon of ponzu sauce
  • 1/2 teaspoon of sesame oil
  • 1 tablespoon of rice wine vinegar
  • 1 teaspoon of freshly grated ginger
  • 2 cloves of garlic, minced
  • scallions and sesame seeds for garnishing

Ingredients for Bok Choy

  • 6 bulbs of bok choy, cut length-wise
  • 1 tablespoon of soy sauce
  • 1 tablespoon honey
  • 1 tablespoon oyster sauce
  • 2 garlic bulbs, minced
  • 1/2 teaspoon freshly grated ginger

Ingredients for Coconut Brown Rice

  • 1/2 cup of uncooked brown rice
  • 1 cup of coconut milk (I used the Trader Joe's 1/2 gallon carton)
  • 1/2 tab of butter

Instructions:
  • Combine all ingredients for salmon, and marinate for up to 24 hours
  • For rice: add coconut milk to sauce pan and heat to medium 
  • Once milk begin boiling add brown rice and butter
  • Once mixture comes to a boil, bring sauce pan to a simmer and cover with lid for 40 minutes
  • After 40 minutes, remove from heat and let sit for 5 minutes
  • While rice is cooking, pre-heat oven to 350 degrees
  • Warm a pan to medium heat and add olive oil, sear salmon for 1 minute on one side
  • NOTE: Do not add remaining mixture to the pan when searing the salmon, it will burn
  • Transfer salmon to aluminum foil, and create a "boat" for the salmon
  • Add remaining sauce to salmon
  • Transfer salmon to oven for 10-15 minutes
  • While salmon is cooking, heat medium size pan, add olive oil and bok choy facing inwards
  • Let bok choy braise for 6-7 minutes
  • Remove from heat, and add remaining ingredients to created a caramelized sauce
  • NOTE: Add garlic last as it will burn. The sauce should take about 5 minutes to caramelize
  • Add bok choy to caramel mixture
  • Serve and enjoy!


Monday, February 1, 2016

28 Day Cleanse: Why am I doing it?

Hello Everyone! This post is a bit more personal, so please keep an open mind as you read :)

Every year I find myself making New Years resolution regarding my body. What I found was that I was focusing too much on a number rather than how I felt. I used to think that what I saw on the scale defined how I should feel. Recently, I decided that was bullshizzle (pardon my french). Yes, I know I am late to the game. But here I am, ready to love my body and love myself.  Honestly, my relationship with food has transformed in this past year. I was a victim of  crash dieting and feeling guilty for wanting to eat that oh so cheesy Domino's pizza or juicy  In-n-Out burger. Restricting everything bad caused me to binge in really unhealthy ways (i.e. I've almost eaten a whole Medium Domino's Pizza to myself!! Eeek!). This concept of binging and restricting was clearly not the way to go. Just this past year I decided to look at food through a new lens: Food is to nourish you.

I discovered a concept that really works for me. It's called the 80/20 Lifestyle. 
What this lifestyle strives for is to have 80 % of your meals be healthy and 20% of your meals to be whatever you want

Example below:

  • In one week (not including snacks), you have 21 meals.
  • This means that 17 of your meals are healthy and 4 of your meals can be as naughty as you want! (within reason, try not to eat a whole Medium Domino's Cheese Pizza in one sitting ;P)

I'm very metric driven, and being able to say "Hey Emily, you can eat super super well for the next 10 meals, but on meal 11 eat that In-n-Out Animal Style Burger with Animals Style Fries. Your soul deserves it!" really helps me stick to realistic goals.

Again, I know I'm late to the game, but it's so refreshing to view food as your friend and not your enemy! For those of you who struggle with this, you know exactly how it feels!

So my point of the 28 Day Cleanse is to introduce myself to this new lifestyle.
It's planned, but not regimented. I really pondered on what really works for me and my body, and I came up with a meal plan! I will be posting every meal and submit status updates through out this cleanse. At the end, I will submit my meal plan and recipes for anyone who is willing and wanting to take on the challenge!

Thanks for reading my personal thoughts, and please follow me on my 28 day journey :)
P.s. I have a super duper awesome boyfriend who wanted to do the cleanse with me as well! The meal plans that I'm posting is for both men and women! You'll see more in detail once I upload the plan.

Cheers!

Don't forget to love yourself today :) 

Displaying FullSizeRender.jpg

Tuesday, December 8, 2015

Spaghetti Squash Three Ways

Hi Everyone! In case you haven't heard, I recently moved to San Diego, CA!
I am so excited becuase I've been away from home for about 6 years now (I'm originally from the OC). To be back home is like a breathe of fresh air. Although I miss my Seattle family terribly, this move to San Diego has been a new sense of awakening for me. I hope that moving back home has got me more inspired than ever to post my love for food for you all. Thanks for stopping by, and please enjoy my latest blog post! (and many more to come :))

Featured today: Yummy, healthy, and easy Spaghetti Squash! This veggie is like the hottest food right now (well, according to my Pinterest feed it is!). Its an excellent substitute for pasta and noodles. Spaghetti Squash is such a versatile ingredient; you can literally take it in any direction! Today I've decided on the Italian route. Due to my move, my pantry is limited, hence only preparing the Spaghetti Squash  in an Italian way. But I did end up doing it three ways for you, so I hope that makes up for it! I will be sure to do another blog post about all the different international way you can work with this wonderful squash.


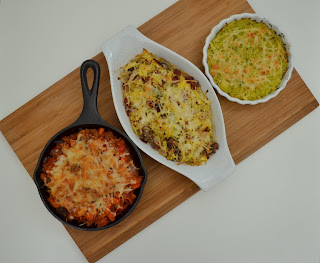
 (From Left to Right) Spaghetti Squash Marinara, Spaghetti Squash Carbonara, Pesto Spaghetti Squash


Spaghetti Squash Three Ways

Recipe makes 1 serving per recipe

Prep Time: 1 hour 15 minutes * Cook Time: 30 minutes

Preparing the  Spaghetti Squash 

Instructions:

  • Preheat oven to 375 degrees
  • Place the spaghetti squash whole on a lined baking sheet
  • Bake for 45 minutes and then flip over for an additional 30 minutes (total time in oven is 1 hour 15 minutes) 
  • Let squash cool for 30 minutes
  • Cut off two end of squash
  • Hold squash right up to slice in half length wise 
  • Scoop out seeds and toss (or save to make yummy roasted seeds!)
  • Scrape gently with spoon for long "spaghetti" like strands
  • Set aside
  • Note: 1 squash makes about 6 cups of spaghetti. I used 3 cups for this recipe, and you can save the rest for quick snack sauté or you can double the recipes :) 


Ingredients & Instructions: NOTE- I baked all three at the same time on a baking sheet

Ingredients:

For the Spaghetti Squash Marinara
  • 1 cup of pre cooked Spaghetti Squash
  • 1 diced carrots
  • 1 cup sliced crimini mushrooms
  • 1/2 cup diced red onion
  • 1/2 diced bell peppers
  • 1/2 cup marinara sauce
  • 1/4 cup of cheese to top
  • salt and pepper to taste
  • olive oil for cooking

Instructions:

For the Spaghetti Squash Marinara
  • Preheat over to 400 degrees
  • Warm up pan to medium heat
  • Add olive oil
  • Saute all veggies for about 8 minutes
  • Add spaghetti squash, saute for 1 minute
  • Add in marinara sauce, and stir in thoroughly
  • Add salt and pepper to taste
  • Transfer mixture to a bake safe dish (like a ramekin or mini skillet!)
  • Top mixture with cheese
  • Bake for 15 minutes, and broil until cheese is brown and bubbly (YUMMM)
For the Pesto Spaghetti Squash 
  • 1 cup of pre cooked Spaghetti Squash
  • 1/8 cup of cheese
  • 1/8 cup of pesto
  • 1/4 cup of shallots, diced

Instructions:

For the Pesto Spaghetti Squash 
  • Preheat over to 400 degrees
  • Warm up pan to medium heat
  • Add olive oil
  • Saute shallots, 2-3 minutes
  • Add spaghetti squash, saute for 1 minute
  • Add in pesto in thoroughly 
  • Add salt and pepper to taste
  • Transfer mixture to a bake safe dish 
  • Top mixture with cheese
  • Bake for 15 minutes, and broil until cheese is brown and bubbly 
For the Spaghetti Squash Carbonara 
  • 1 cup of pre cooked Spaghetti Squash
  • 2 slices of turkey bacon, cooked and diced
  • 1 shallot, diced
  • 1/2 cup sliced crimini mushrooms
  • 1 egg
  • 1/4 cup of chicken stock
  • 1/4 cup of parmesan cheese


Instructions:

For the Pesto Spaghetti Squash 
  • Preheat over to 400 degrees
  • Warm up pan to medium heat
  • Add olive oil
  • Saute shallots, mushrooms
  • Add turkey bacon bits
  • Set mixture a side in a bowl
  • Turn of heat, and set pan to the side to cool
  • In a bowl, whisk together egg and add 1/8 cup of parmesan cheese
  • Put mixture in pan and ad chicken stock, mix until incorporated
  • Incorporate shallots, mushroom, bacon bits, and spaghetti squash in pan
  • Add salt and pepper to taste
  • Transfer mixture to a bake safe dish 
  • Top mixture with cheese
  • Bake for 15 minutes, and broil until cheese is brown and bubbly 


Seriously, who needs pasta when you got Spaghetti Squash?? 
Jk I love my carbs, but these are a great alternative :) 


Thursday, October 15, 2015

Pistachio Pesto Crusted Cod with Mashed Carrots and Sweet Potato


 Pistachio Crusted Cod with Mashed Carrots and Sweet Potato


Pistachio Crusted Cod with Mashed Carrots and Sweet Potato

Recipe makes 2 servings

Prep Time: 10 minutes * Cook Time: 30 minutes

Ingredients:

For the Cod
  • 2 four oz. Cod Fillets
  • 1/4 cup of pistachios, roughly chopped
  • 1 tablespoon of pesto
  • 1 dash of salt per fillet
  • 1 dash of pepper per fillet
For the Mashed Carrots and Sweet Potato
  •  2 carrots, peeled and chopped into 1/2 inch
  • 1/2 sweet potato, peeled and cubed
  • 1/2 cup greek yogurt
  • 1 tablespoon of butter
  • 2 tablespoons of feta
  • 1 shallot, sliced and sauteed
Instructions:
For Pistachio Crusted Cod
  • Preheat oven to 400 degrees
  • Pat both fillets dry
  • Sprinkle fillets with salt and pepper
  • Spread pesto on fillets
  • Spread pistachios over cod fillets, make sure the fillets are well coated for a guaranteed crispy crust :)
  • Place fillets on parchment covered baking sheet
  • Bake for 20 minutes 


Super delicious, easy, and healthy meal! Enjoy!


Sunday, August 16, 2015

Moroccan Naan Sliders with Peach Chutney and Pistachio Pesto

Everybody loves a good slider. Whether is juicy beef sliders or mini fried chicken sammys, everyone has a go to slider. On a whim, I decided to take the classic slider and re-make it with a twist! Hence my latest blog post. This dish is a perfect appetizer and is very easy to make. Enjoy!


Roasted Moroccan Naan Sliders with Peach Chutney and Pistachio Pesto


Moroccan Naan Sliders with Peach Chutney and Pistachio Pesto

Recipe makes 8 sliders, 4 servings


Prep Time: 20 minutes * Cook Time:20 minutes

Ingredients:

For the Burger
  • 1 lbs of ground beef ( I used 80/20 Traders Joe's Grass Fed Beef)
  • 2 tablespoons fresh cilantro
  • 1 clove garlic, minced or grated
  • 1 teaspoon fresh lemon zest
  • 1 tablespoon cumin 
  • pinch of cayenne pepper
  • 1/2 teaspoon cinnamon
For the Peach chutney
  •  2 ripened peaches, diced
  • 1/2 red onion
  • 1/4 red bell pepper, diced
  • 1/2 jalapeno, diced
  • 1/3 cup of apple cider vinegar
  • 1/8 cup of honey
  • pinch of cayenne pepper
  • salt and pepper to taste
For the Pistachio Pesto
  • 1/2 cup of feta cheese
  • 1/2 cup of olive oil
  • 2 tablespoons of roasted pistachios
  • 2 tablespoons of freshly chopped cilantro
Packaged Naan
  • This can be found at your local grocery store, I used Trader Joe's Garlic Naan, it can be found in the frozen isle

Instructions:

For Peach Chutney
  • Heat up a pan over medium heat, add olive oil
  • Add red onions, red peppers and peaches, saute for about 5-7 minutes until caramelized
  • Add jalapenos, cook for additional 2 minutes
  • Add apple cider vinegar and honey, cook until mixture is reduced
  • Add salt and pepper to taste 
  • Note: the chutney should taste primarily sweet
  • Set mixture aside once cooked, let mixture cool
For the Pistachio Pesto
  • Add all ingredients into food processor, and blend until pesto consistency
  • Set aside
For Burger
  • Combine all spices and cilantro into ground beef
  • Divide patties into 8 and from into patty sliders
  • Heat pan at medium high
  • Cook burgers to your liking, I personally like mine medium well, so I cooked them for about 4 minutes on each side
Assemble the burger into little slider, and enjoy!!


Tuesday, July 21, 2015

Roasted Tomato Basil Soup

Happy Tuesday Ya'll! So I found myself fever ridden due to an infection today, and decided to leave work early. Whenever I am feeling under the weather, I crave the living daylights out of SOUP! Yummy, delicious, savory liquid goodness. Today in particular I was craving Tomato Basil Soup, hence todays blog post. Enjoy!


       Roasted Tomato Basil Soup


Roasted Tomato Basil Soup

Recipe makes 2 servings, makes 4 cups of soup

Prep Time: 40 minutes * Cook Time: 2 Hours

Ingredients:

  • 6 rippend tomatoes
  • 2 yellow onions, diced
  • 2 cloves of garlic
  • 1 1/2 cup of basil, packed
  • 2 cups of chicken stock
  • 2 tablespoons of olive oil, plus some to sauté vegetables
  • 1 slab of butter
  • 1 teaspoon dried oregano
  • 1/4 cup of half and half
  • salt and pepper to taste
  • parmesan cheese & julienned basil for garnish (optional)

Instructions:

  • Pre-heat oven to 400 degrees
  • Wash and cute tomatoes in halves, length wise. Coat tomatoes in 2 tablespoons of olive oil
  • Bake tomatoes for 40 minutes
  • Once tomatoes are baked take out to cool
  • In a pot, add olive oil, butter and onions. Saute for 10 minutes and then add garlic
  • Sauteed until onions are caramelized (additional 5 minutes). Add chicken stock, basil, and oregano
  • Let mixture simmer for 45 minutes to an hour
  • Puree mixture, and add back to pot over simmering heat, slowly add half and half
  • Simmer for additional 10 minutes
  • Plate and eat! Garnish with fresh herbs and freshly grated cheese!

P.S. I totally paired mine with an ooey gooey grilled cheese :) 


Tuesday, July 14, 2015

Bim Bim Bap with Cauliflower Rice

I have great memories as a child sitting in a Korean BBQ house. The sizzling fresh meat, silky tofu soup, and crunchy assorted pickled vegetables. Can you stay nostalgia? In efforts to keep my childhood foods in my life, I have crafted a guilt free recipe for the infamous Bim Bim Bap! For those of you who are not familiar with this dish, its of Korean origin and is essentially a rice bowl. The trick it to cook the rice in a clay pot so the rice sticking to the clay turns into crispy rice (all of my asians know how coveted crunchy rice is). The rice bowl is then filled with pickled veggie like kimchi, cucumbers, bean sprouts etc. korean marinated beef, and topped with an ooey gooey sunny side up egg. Please check out my Bim Bim Bap made with cauliflower rice! :) 

Bim Bim Bap with Cauliflower Rice


Bim Bim Bap with Cauliflower Rice

Recipe makes 2 servings

Prep Time: 20 minutes * Cook Time: 10-15

Ingredients:

  • Trader Joe's Marinated Kalbi Beef (I cheated here and went with store marinated beef since I was pretty busy this week)
  • 1/2 head of cauliflower
  • 1 cup crimini mushrooms
  • 1 stalk of green onion
  • 1 large egg
  • 1 cucumber
  • 1 carrot
  • 1/4 cup rice vinegar
  • 1/8 cup of agave nectar
  • 1 teaspoon of sesame oil
  • Olive oil for cooking

Instructions:

  • Take cauliflower, and pulse in a food processor until it looks like little bits of rice. Once completely pulsed, set aside in a bowl
  • Julienne carrots and cucumbers (I got excited and used my vegetable spiralizer so make pretty veggie curls!!)
  • In a separate bowl, combine rice vinegar, agave, and sesame oil. Whisk until combined and then add julienned veggies to the bowl. Let the mixture sit in the fridge for 10 minutes. This is what we call a "quick pickle"
  • Slice up mushrooms and cook over medium heat until caramelized. Set aside
  • Unwrap and portion out two serving sizes of the Trader Joe's packaged beef. Julienne the beef.
  • In a pan, turn heat to medium-high and add olive oil. Once oil is hot add julienned beef to pan
  • Cook on high heat for about 5 minutes until beef is caramelized. Once beef is done, set pan away from heat
  • In a clean pan, turn to medium heat and add olive oil. Once oil is hot ad cauliflower rice and cook for about 4 minutes
  • Once cauliflower rice is cooked, put in a bowl
  • In the still warm pan, add more oil and crack the egg. You can cook the egg anyway you like, I prefer mine sunny side up so the yolk can get all in my food :)
  • Once all ingredients are cooked, assemble the pickled veggies, mushroom, and beef into the bowl filled with cauliflower rice. Add egg on top. Garnish with chopped green onion

Enjoy!